In the previous post, I trained CipherYogi to recognize my face and use the superpower to authenticate me before it performs any other magic for me. Now that CipherYogi has learnt it and shall master it over a period of next few months wherein I intend to figure out how it could progressively train itself further, I will now make it take baby steps towards identifying the objects I use – my watch, my mobile, my laptop etc etc. In this post, I will be covering how CipherYogi learns to identify these objects. I have used live webcam feed as the input, however it can very well be done on image or video as input (i.e you can make it detect if a given object is there or not in an image or a video).
Following are the steps we will follow:
- Gathering samples – negative and positive.
- Training cascade using sample images
- Use cascade for object detection
Step 1:
First things first. In order to train cascade, we need a whole lot of sample images – both positive (one with the object) and negative (one without the object), say 1000+ each with ideally 2:1 ratio of positives to negatives. As you would have guessed, getting negative images sounds like an easier problem. In my example here, I will be training to identify my watch and it’s not easy for me to find thousands of images of my watch, right? Well, not really. We have some good news here. All we need is just one positive image (as a minimum), and use built-in function opencv_createsamples() which shall reuse the same image to generate a set of positive images. It does so by rotating the positive image at various angles and superimposing on negative images. So, what we really need therefore to get started is – a bunch of negative images and one positive image. While you can use your own images for the negative image set as long as you are sure none of them carry the object to be detected, there is a another way to create the set. And that is simple download from image-net.org (visit the website and create an account. You can use the images for non-commercial purposes). This part can be automated using a script like the one below. So, let’s start by importing the necessary libraries.
import urllib.request
import cv2
import numpy as np
import os
And now we are all set to fetch negative images. In the code below, I have fetched images from 4 different Image-net URLs into a folder neg. Have converted image to GRAYSCALE, and resized to a standard 100 * 100 before saving them with a counter (pic_cnt) as the filename. This approach allows me to fetch more images at a later date without worrying about existing ones getting overwritten. Please note that ids here is a list of WordNet IDs used to create URL for fetching image URLs. You can find more about them here
import urllib.request
import cv2
import numpy as np
import os

def fetch_images():
    ids = ['n00523513', 'n02119789', 'n02478875', 'n02473983']
    for id in ids:
        print(id)
        neg_images_link = 'http://image-net.org/api/text/imagenet.synset.geturls?wnid='  + id
        neg_image_urls = urllib.request.urlopen(neg_images_link).read().decode()

        if not os.path.exists('neg'):
            os.makedirs('neg')

        pic_cnt = len(os.listdir('neg')) + 1
        for i in neg_image_urls.split('\n'):
            try:
                f = open("neg/"+str(pic_cnt)+".jpg", 'wb')
                f.write(urllib.request.urlopen(i, timeout=5).read())
                f.close()
                img = cv2.imread("neg/"+str(pic_cnt)+".jpg",cv2.IMREAD_GRAYSCALE)
                resized_image = cv2.resize(img, (100, 100))
                cv2.imwrite("neg/"+str(pic_cnt)+".jpg",resized_image)
                pic_cnt += 1
            except Exception as e:
                print(str(e))
fetch_images()
Now that we have negative images we need to ready our positive image for superimposition. So, we will resize the image to something like 50 * 50 (since our negatives are 100 * 100). For step 2 of the process, we need to move the negative image set neg (around 2000 images) into OpenCV workspace of a server along with the positive image. This is because this step is computationally intensive and thus we are better off executing it on a more powerful machine. You can get from AWS, Azure or other service providers. However, I have used Google Colab notebook here which provides a machine powerful enough. (Dear Google – sending love!).
So, I now copy my neg folder to the Google drive (apparently, there are ways to automate upload from local drive to Google drive, but I have used the old-is-gold approach of copy-paste :). If, however, you are looking at automating it, which I feel you should, here’s one explainer you might find useful). My object image is watch01.png, and I have copied it to my colab drive as well. We then simply mount the drive using drive.mount() command and then navigate to our working directory. We then simply read the image, resize it to 50*50 and save it. I have used _5050 as suffix to the original image name, you may choose whatever you prefer.
from google.colab import drive
drive.mount('/content/drive')

%cd /content/drive/My\ Drive/Object_Detection2

import cv2
img = cv2.imread('watch01.png')
resized_img = cv2.resize(img, (50,50))
cv2.imwrite('watch01_5050.jpg', resized_img)
Resized image is here: 
Step 2: Training Cascade
Now that we have the ingredients in place, let’s start cooking! Oh… wait…let’s just do some quick stuff to ensure sanity of our workspace. For this, I have written a few lines of code to delete all files other than neg and watch01_5050.jpg before execution. Of course, you don’t need this if you are running it for the first time or delete files manually (I found it painfully slow though and hence wrote the code to do it instead). We then make 2 directories:
info: To save all positive samples and a file info.lst which captures information regarding placement of object image over each negative image.
data: To capture cascade.xml which will be used for detecting object.
import shutil
import os
path = './'
all_files = []
all_files = [file for file in os.listdir(path)]
print(all_files)
for file in all_files:
  if(os.path.isdir(file)):
    if(file in ['neg', 'watch01_5050.jpg']):
      continue
    else:
      shutil.rmtree(file)
  else:
    os.remove(file)

os.mkdir('info')
os.mkdir('data')

images = [img for img in os.listdir('neg')]
for img in images:
          img_path = 'neg' + '/' + img + '\n'
          with open('bg.txt','a') as f:
               f.write(img_path)

!opencv_createsamples -img watch01_5050.jpg -bg bg.txt -info info/info.lst -pngoutput info -maxxangle 0.5 -maxyangle 0.5 -maxzangle 0.5 -num 1950

!opencv_createsamples -info info/info.lst -num 1950 -w 20 -h 20 -vec positives.vec

!opencv_traincascade -data data -vec positives.vec -bg bg.txt -numPos 1800 -numNeg 900 -numStages 10 -w 20 -h 20
And now, it’s time for action! We now create a background file bg.txt which would tell openCV where to find negative images for creative positive samples. To do so, we simply iterate over contents of neg and append path of each file in bg.txt. We now thus have 3 files in our working directory right now – neg, watch01_5050.jpg, and bg.txt.
To create samples, we use the command below:
!opencv_createsamples -img watch01_5050.jpg -bg bg.txt -info info/info.lst -pngoutput info -maxxangle 0.5 -maxyangle 0.5 -maxzangle 0.5 -num 1950
-img watch01_5050.jpg:It’s telling openCV where to find positive sample-bg bg.txt: where to find negative samples-info info/info.lst:information on positive samples is compiled in a info.lst file. A sample entry in the file looks like"0001_0059_0020_0027_0027.jpg 1 59 20 27 27"which comprises of name of positive sample followed by number of objects in the image (1 in our case) and then the object rectangle – (x, y, width, height)-pngoutput info:destination of positive samples. info directory in our case-maxxangle 0.5 -maxyangle 0.5 -maxzangle 0.5:this is an optional parameter and specifies maximum rotation angle before superimposition-num 1950: number of samples
!opencv_createsamples -info info/info.lst -num 1950 -w 20 -h 20 -vec positives.vec
In this line, we create. vector file which is basically just a stitched version of all the positive samples. Here we have used 20*20 as the dimension of the images in vector file. One could use higher than this, but it would take longer to run the trainer.
!opencv_traincascade -data data -vec positives.vec -bg bg.txt -numPos 1800 -numNeg 900 -numStages 10 -w 20 -h 20
So, finally we train the cascade. This code works like below:
-data data:specifies the directory where cascade will be saved. It is data in our case.-vec positives.vec:vector file to be picked for training-bg bg.txt:background file for locating images that we used for superimposition (negative images in our case)-numPos 1800 -numNeg 900:number of positive and negative images to be used for training-numStages 10:number of stages of training. Depending upon the number of samples, your trainer might not run through all stages. You can find stage-wise files in the data folder and the cascade file as an output of the last executed stage.-w 20 -h 20:width and height
So, my code ran for 8 stages and generated cascade.xml file which I will now use for detecting object i.e my watch.
Step 3: Detecting object
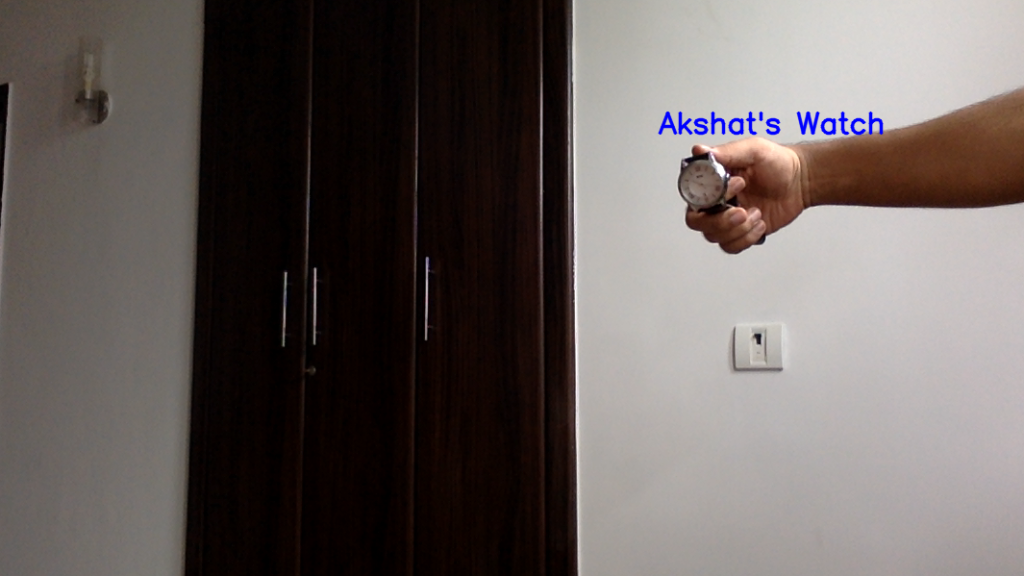
Finally, we use the cascade to detect objects. The file cascade.xml generated in step 2 and saved in data directory is copied to local drive in a folder named cascades in the local working directory. I have renamed the cascade as watch_01_stage8.xml. Next, I create a list user_cascades wherein I add the cascades (of course, for now we have just one). Then I have created one more list user_objects to store names of objects we are trying to detect. I have done so because I intend to add more objects in future and this code makes it forward compatible thereby. Once done, we take video feed using cv2.videocapture(0) and use the cascades to detect objects in the input frames. If found, we print the object name with “Akshat’s” as the prefix (e.g “Akshat’s watch”). As I add more object cascades, I need to simply copy the cascades files in the cascades directory and rename the file in such a way that it has object descriptor in the beginning followed by an underscore.
def ObjFinder():
    user_cascades = [cv2.CascadeClassifier('./cascades/' + cascade) for cascade in os.listdir('./cascades')]
    user_objects = [filename.split('_')[0] for filename in os.listdir('./cascades')]
    cap = cv2.VideoCapture(0)
    while 1:
        ret, img = cap.read()
        gray = cv2.cvtColor(img, cv2.COLOR_BGR2GRAY)
        for i in range(len(user_cascades)):
            user_objs = user_cascades[i].detectMultiScale(gray)
            for (x,y,w,h) in user_objs:
                font = cv2.FONT_HERSHEY_SIMPLEX
                cv2.putText(img,'Akshat\'s ' + user_objects[i],(x-w,y-h), font, 1, (255,0,0), 2, cv2.LINE_AA)
        cv2.imshow('img',img)
        k = cv2.waitKey(30) & 0xff
        if k == 27:
            break

    cap.release()
    cv2.destroyAllWindows()
We then add it to the core CipherYogi function and let the magic begin!
def CipherYogi():
    SpeakText("Please look at camera for Authentication")
    AKSHAT_AUTH = FaceinVideoStream()
    time.sleep(5)
    if(AKSHAT_AUTH):
         SpeakText("Akshat Authenticated")
         ObjFinder()
Woohoo!
CipherYogi()